
Yay!!! I’ve got a new infrared camera! (but the image above is made with my old axe, as discussed below.)
Since 2006 I’ve used tried and true converted Nikon DSLR camera for infrared (I did the conversion myself, taking the camera apart, removing the “hot mirror,” and substituting a 7200 nm infrared filter). Just this week I’ve got a new rig, which is much much better. I sent my E-PL5 micro four thirds camera into a place called Kolari Vision to be converted. I’m so happy with the results, though I don’t have anything good enough to post here yet — only tests. On the whole though it is fantastic to be able to see a live view on the LCD as I work with the camera, and it looks like a nearly Black and White image on the screen, too. With the old DSLR, I looked through the viewfinder and had to visualize the image as infrared. Then, after shooting, I could see a very red and hard to read image on the LCD; it was then that I could see how the exposure came out, and adjust the exposure as necessary. This was still a big step forward from my earliest infrared work, which used 4 x 5 Kodak sheet film in holders.
There was so much trouble with this approach. I was inspired by Minor White’s success with it (at the time, in my early 20s, I was quite influenced by Minor White, who was a bit of an visual adventurer compared to many of his view-camera using contemporaries, many of whom I also admired, of course, especially Paul Caponigro). But at the time, the film holders often leaked a bit of infrared light. I had to be careful with them, and I kept them in a big metal ammo box I carried for my film holders. Then, of course, it was impossible to meter. My spot meter did a pretty poor job, and I was much better just guessing the manual exposure on the view camera. Sunny day, cloudy day — make a guess. Also, the film was quite fragile and was prone to scratching and getting pinholes in the emulsion as I developed it. Quite often the expensive sheets of film were worthless, just a mess of fog or hardly any image on a clear sheet, or full of scratches. I did get a few though, with the sheet film, like this Bare Apple, which was one of my first big successes with the medium, and which inspired me to go on. In the end I probably had a few percent of all my attempts at large format infrared sheet film turn out.
Eventually as I was a parent of young children, it was pretty hard to have so much patience with a view camera, and I found there was medium format film, which I used a bit. But that had its problem; a roll of it would tie up the camera, so I would have to shoot through the whole thing. Usually when I wanted infrared, I didn’t have it in the camera. I don’t think I have anything on the site to show for those rolls of medium format infrared film, but some may be worth scanning.
So, the converted DSLR was great in 2006, and I have done a lot of work with it; far more than is posted here. That camera fell off the seat of a jeep in the jungle in Nepal last year, ruining the top LCD display. It still works and is quite usable, but like I say, I’m very excited for this step up, and I’ve got lower noise, higher ISO, a good choice of excellent micro four thirds lenses, and small enough to carry along with standard-light photo gear. I did that before of course, but it was another entire DSLR bag across one of my shoulders.
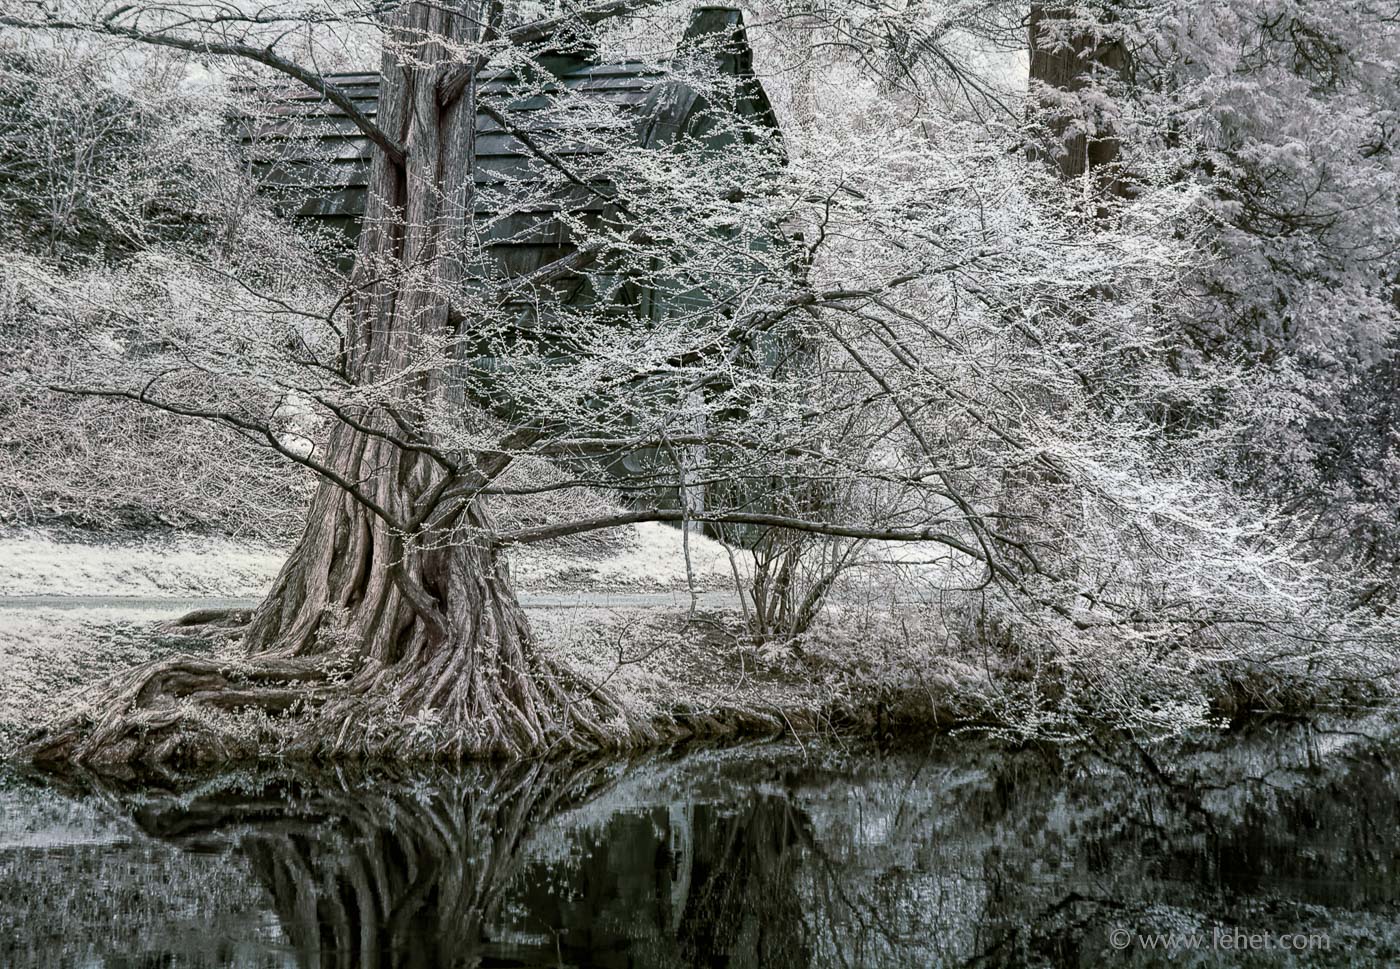
When I started doing digital infrared, there wasn’t much talk about post-processing, and I knew I wanted black and white images in the end (even if at times I simulated the split toning I used to do with selenium and silver chloride paper int he darkroom — simulated that traditional toning with a photoshop color layer). But when I revisited the camera conversion this time around, I ran into a lot of talk about post processing, and the different color aspects of the various wavelength infrared filters I had to choose from. The takeaway is that I became newly aware that there is color information in the infrared image which can be useful. While I am not a fan of crazy over-the-top color effects, I became intrigued by the possibility of having a bit of color information to work with instead of just throwing all color away to start working with the image, which I had done previously.
So for the image above, I used this color to separate the redwood tree from the busy background, and I found I could make this image work. Before I did this, I could never find a way to present this image without it being too busy. I’m pretty happy with this interpretation, with just a tiny bit of tonal variation.
This print is for sale here.
Very nice.